
Arches National Park’s unique geological formations and minimal light pollution make it an ideal destination for capturing the breathtaking beauty of the Milky Way. With the right camera gear and careful planning, photographers can immortalize the galaxy’s brilliant display against these iconic natural wonders. By understanding the essential equipment and techniques required, one can unlock the park’s full astrophotographic potential. However, navigating the complexities of Milky Way photography in this rugged environment demands a strategic approach. Those who dare to venture forth may uncover a captivating celestial experience that transcends the boundaries of traditional landscape photography.
Key Points
- Choose a DSLR or mirrorless camera with high ISO performance and pair it with a fast, wide-angle lens to capture the Milky Way in Arches National Park.
- Plan your photography session by departing at 10:30 PM, meeting at designated locations, and dressing warmly to account for chilly night temperatures.
- Experiment with exposure times, apertures, and ISO settings to find the optimal settings for Milky Way photography, and be patient as multiple shots may be necessary.
- Incorporate foreground elements like iconic arches or geological features to add depth and scale to your Milky Way compositions.
- Avoid light pollution by planning your shoot during new moon or waxing crescent phases and choosing locations away from main roads and visitor centers.
Selecting the Right Gear
For a successful Milky Way photography experience in Arches National Park, having the right gear is essential.
Opt for a DSLR or mirrorless camera capable of high ISO performance, paired with a wide-angle lens (14-35mm for full-frame or 10-24mm for crop sensor) with a fast aperture (f/3.5 or lower).
A sturdy tripod is a must to capture the sharp, long exposures needed for Milky Way shots.
Don’t forget a headlamp or flashlight with a red setting to preserve your night vision.
While a spare tripod may be available if needed, it’s best to bring your own reliable gear to ensure a seamless photography session.
You can also read our reviews of more tours and experiences in Moab.
Planning Your Photography Session
With the right gear in hand, it’s time to plan the photography session in Arches National Park. The tour departs at 10:30 PM, allowing ample time to capture the Milky Way.
Travelers meet at the Wingate by Wyndham Moab or the Moab Information Center before being transported to the prime shooting locations within Arches. The group size is limited to 4, ensuring personalized attention.
Remember to bring a sturdy tripod and dress warmly, as night temperatures can be chilly. Snacks and water will be provided, but it’s wise to have additional layers and headlamps ready.
This unique experience promises stunning Milky Way shots in one of the most photogenic national parks.
Capturing the Milky Way
Capturing the Milky Way requires patience, planning, and a keen eye for composition.
To capture the galaxy in all its glory, you’ll need to choose your location carefully, set up your camera properly, and be prepared to experiment with different settings. Start by finding a spot with minimal light pollution, where the Milky Way is clearly visible.
Use a wide-angle lens and a sturdy tripod to keep your camera steady. Experiment with exposure times, apertures, and ISO settings to find the perfect balance.
Be patient and take multiple shots – the Milky Way can be elusive, and you may need to try a few different compositions to get the perfect shot.
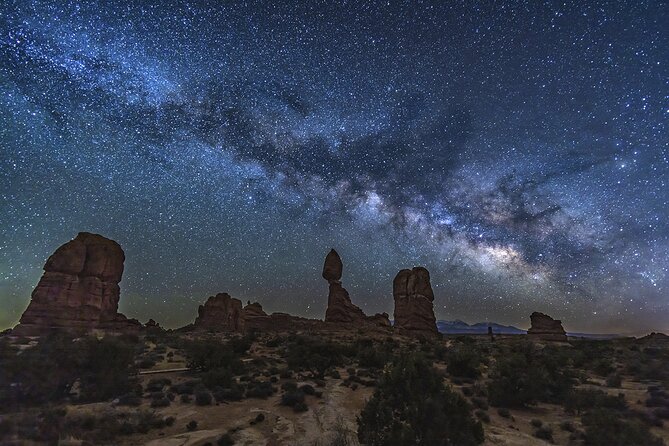
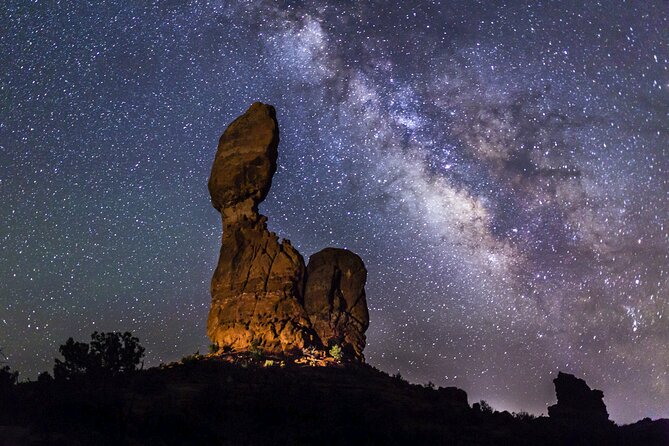
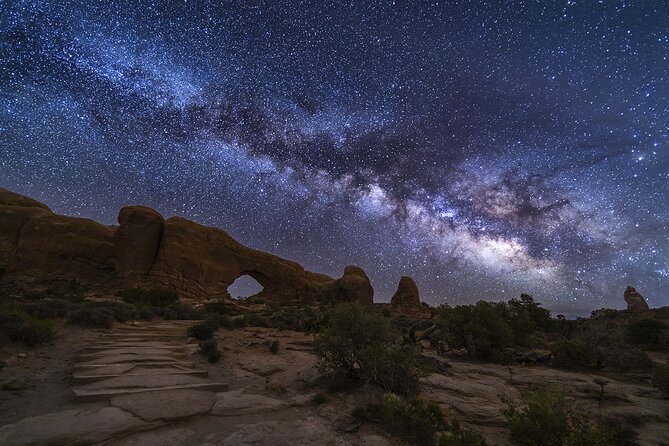
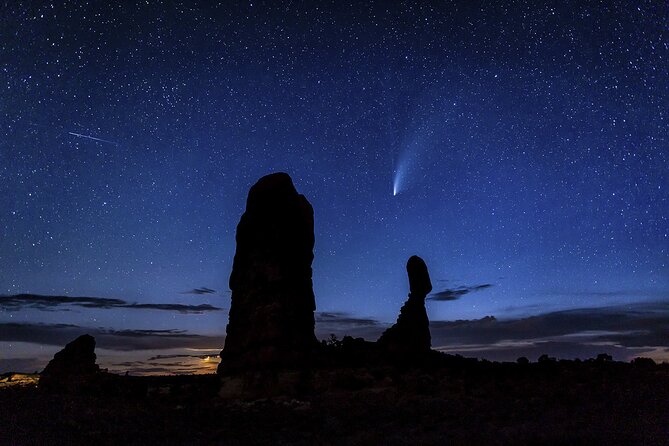
Composing Your Shots
How do you compose your Milky Way shots in Arches National Park? Positioning is key. Include the iconic arches or other geological features in the foreground to provide scale and depth.
Experiment with different angles and perspectives to capture the vastness of the night sky. Use the rule of thirds to balance the Milky Way and landscape. Anticipate the Milky Way’s position and adjust your composition accordingly.
Include an interesting focal point, such as a hoodoo or silhouetted tree. Be mindful of the location of the moon, as its light can wash out the Milky Way.
With practice and creativity, you’ll capture stunning images that showcase the beauty of Arches at night.
Dealing With Light Pollution
One challenge photographers may encounter in Arches National Park is light pollution, which can diminish the visibility of the Milky Way.
To overcome this, it’s crucial to plan your shoot for a new moon or a waxing crescent moon phase, as the moonlight can also interfere with capturing the Milky Way.
Plus, choosing a location in the park that’s away from the main roads and visitor centers can help reduce the impact of artificial lighting.
Post-Processing Your Images
Once you’ve captured your stunning Milky Way images in Arches National Park, it’s time to dive into post-processing. This crucial step enhances your photos, bringing out the vibrant colors and details of the Milky Way.
Start by adjusting the white balance to correct any color casts. Then, use editing software to increase the contrast, bring out the stars, and reduce noise.
Be careful not to over-process, as this can result in unnatural-looking images. Finally, consider adding a vignette or adjusting the composition to draw the viewer’s eye to the Milky Way.
With a bit of post-processing, your Arches Milky Way shots will truly shine.
Safety Considerations

Safety is paramount when venturing out to photograph the Milky Way in Arches National Park at night. The park’s remote location and rugged terrain pose unique challenges, so proper preparation and precautions are essential. Participants should bring a reliable headlamp, wear sturdy hiking boots, and stay hydrated. Hikers should also be aware of their surroundings and avoid approaching wild animals. To ensure a safe and successful experience, consider the following guidelines:
| Consideration | Tips |
|---|---|
| Navigation | Use a map, compass, and GPS device to avoid getting lost. |
| Terrain | Be cautious of uneven ground, loose rocks, and steep inclines. |
| Weather | Check forecasts and dress appropriately for cold temperatures. |
| Wildlife | Maintain a safe distance from all animals and do not approach them. |
Frequently Asked Questions
What Is the Best Time of Year for Milky Way Photography in Arches?
The best time for milky way photography in Arches is between March and October, when the milky way is most visible in the night sky. The dark skies of Arches provide excellent conditions for capturing the galaxy.
Can I Rent Equipment if I Don’t Have the Required Gear?
The tour offers a spare tripod if needed, but travelers must bring a DSLR or mirrorless camera with a wide-angle lens and tripod. Loaner equipment is limited, so it’s best to have the required gear for the experience.
Is There a Minimum Number of People Required to Book the Tour?
The tour requires a minimum group size of 2 travelers, as noted in the "Maximum Group Size" section. Individuals can book the tour, but it will need to be combined with another solo traveler to meet the minimum group size.
Are There Any Age Restrictions for Participating in This Activity?
There are no age restrictions, but the activity is not recommended for travelers with poor night vision. Participants should have a moderate fitness level to navigate the terrain during the tour.
Can I Take a Private Tour Instead of Joining a Group?
Yes, private tours are available for the Milky Way photography experience. Travelers can request a private tour instead of joining a group, subject to availability and additional fees. Contact the tour provider for more details and pricing.
Recap
Milky Way photography in Arches National Park is a truly captivating experience. With the right gear, planning, and techniques, photographers can immortalize the galaxy’s dazzling splendor against the park’s iconic natural formations. By considering light pollution, safety, and post-processing, one can create stunning images that showcase the breathtaking beauty of this natural wonder. The key is to take in the moment and experiment with various compositions for unforgettable results.
More Tour Reviews in Moab
Not for you? Here's more things to do in Moab we have recnetly reviewed
- 2 Best Canoe And Kayak Experiences In Moab
- 7 Best Full-Day Tours In Moab
- 8 Best Helicopter Flights And Tours In Moab
- 2 Best 2 Day Tours In Moab
- ZZZ Inactive
- ZZZ Inactive
- Moab Astrophotography Workshop Experience
- Self Guided Backcountry Jeep Adventure
- Guided Mountain Biking Tour (Intermediate) in Moab
- Delicate Arch Trail Self-Guided Audio Walking Tour
- Insane Rock Buggy Tour
- Moab Custom 4 Seat Kawasaki KRX® 1000 Off Road UTV Rental